An Introduction to jsPlumb

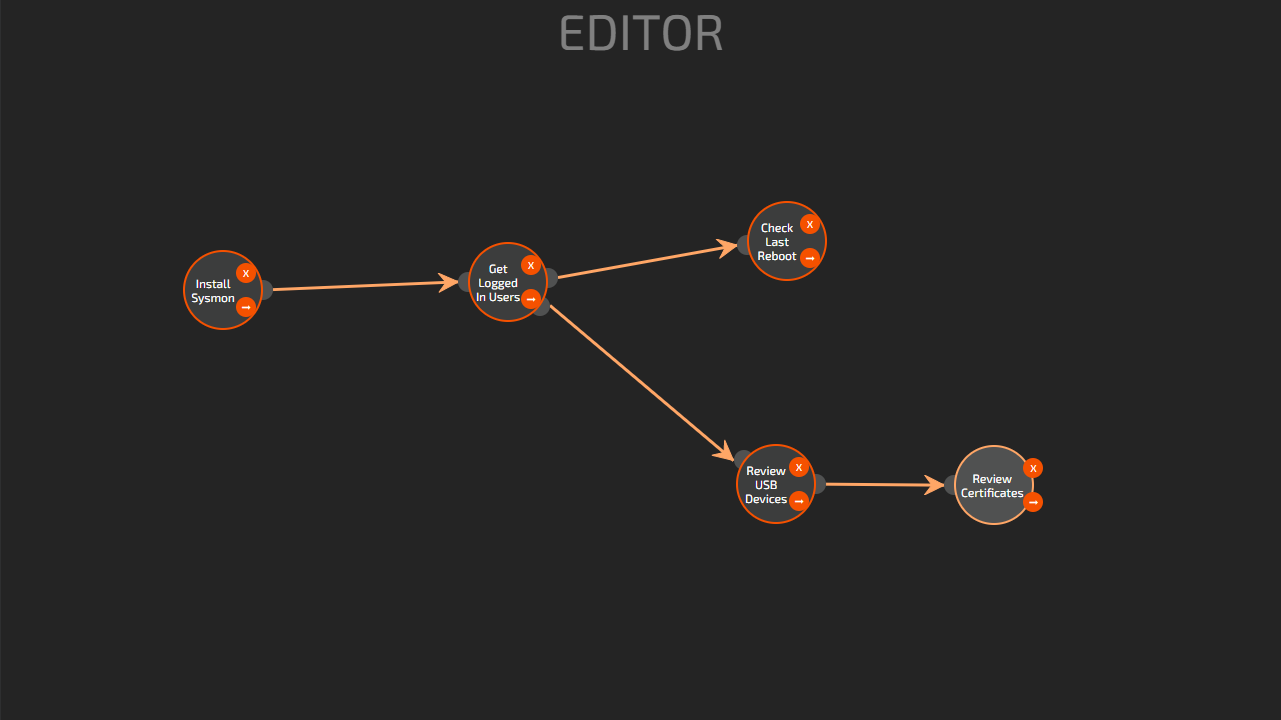
We’ve known for a while that one of the important features of Fantastic is a quest system, but we had some other key features to get working before we could turn our attention to how we present quests. The time has finally come to start thinking about this and come up with a solution. I drew upon my game development background for inspiration and decided we should make something ressembling a skill tree, where you start at one point and have branching paths to guide you in the right direction while presenting some choices. Another requirement of this feature is that we must provide an editor to allow ourselves and others to create these tree layouts, and of course a client to present them to the user in a non-editable form.
Fantastic uses JavaScript throughout the codebase, so I had a look around to see if any existing libraries might make this task easier, and I came across jsPlumb which has some very convincing live demos on the website, so I decided to use it. I found it to be pretty powerful and flexible, however the documentation doesn’t really ease you into things, so I thought I would publish a sort of “Getting Started” guide here to help people who are interested in using this library, but struggling to get it to work. The final version will use NW.js for the editor, as this gives us access to Node.js functionality in addition to the full browser stack, and of course the client will be integrated into the Fantastic front-end. However I started off with a simple HTML prototype to find my way around jsPlumb.
About jsPlumb
jsPlumb is a JavaScript framework for drawing diagrams in which the elements are connected up such as flowcharts and state machines. It differs from some other options out there by using standard HTML Elements to display the nodes, and SVG to render the connections between them. I like this because you get all the usual styling options and event listeners you have with HTML.
There are two jsPlumb plans: the paid Toolkit edition, and the free Community edition. I decided that the free offering was good enough for our purposes. The project is in a bit of an odd limbo at the moment where a new Typescript version is in active development, but the documentation still refers to the existing stable version which will be deprecated soon. I decided to learn how to use the new version as this was recommended by the README on GitHub, however figuring everying out is a little tricky because it requires cross referencing the documention with the README from the new branch. This guide is using version 4.x which can be found on the dev/4.x branch on github, and @jsplumb/community on npm. At the time of writing the latest version is 4.0.0-RC28. I have to say that the developer has been very responsive with fixing any bugs I’ve come across, just put in an issue on the GitHub if you find something that’s supposed to work and doesn’t.
Useful links:
- jsPlumb Community Documentation
- jsPlumb 4.x README
- jsPlumb 4.x doc directory (the changelog is in here)
Setup
The simplest way to get the 4.x version is to install it from npm like this: npm i @jsplumb/community. Of course, you will need Node.js installed first.
If you want to use it directly in a script tag set the source to node_modules/@jsplumb/community/js/jsplumb.dom.umd.js, if you’re using something like webpack to transpile your code, just do require('@jsplumb/community').
Initialization
You’ll need an HTML Element to serve as a container. Technically it doesn’t have to have a size as you can drag elements outside of the container, but I would recommend setting one, I’ll show you further down how to constrain to the container bounds. The most important thing is to specify position: relative in the element’s styling. You must also set an ID on this element.
The jsPlumb.ready() function provides a convenient callback to run your code once the DOM has initialized. You should use this as you’ll likely run into problems otherwise. In 4.x the only supported way to initialize jsPlumb is to use jsPlumb.newInstance(). You can supply an options object to this function to define the default behaviour for all elements of the diagram, think of it a bit like a theme that you can override as needed on individual elements.
You can see the full list here, however 4.x uses camelCase instead of the full Capitalization you can see here. Refer to the 4.x README for more differences. There are a lot of things you can set, but I’ve picked out some of the more useful ones:
container- ID of the HTML Element we created earlier to use as a container.anchor- where connectors can attach to the nodes.connector- this is the actual line drawn between nodes.endpoint- the element that joins connectors to the nodes. Unless you use theBlanktype, these can be dragged to move, create or delete connections.endpointStyle- styling options for endpoints. If you want editable but invisible endpoints setopacity: 0here.paintStyle- connector styling.maxConnections- does what it says on the tin. Use -1 for infinite connections.connectionOverlays- add stuff like arrows to the connectors.
Let’s put all that together:
jsPlumb.ready(() => {

  const instance = jsPlumb.newInstance({
    // position connections at the nearest point on a circle around the nodes
    anchor: ['Perimeter', {shape: 'Circle'}],
    // straightforward line connector leaving a 10 pixel gap from the nodes
    connector: ['Straight', {gap: 10}],
    // the line will be orange and 3 pixels thick
    paintStyle: { stroke: 'rgb(255, 166, 102)', strokeWidth: 3 },
    // allow infinite connections between nodes
    maxConnections: -1,
    // draw an arrow at the end of the connectors
    connectionOverlays: [
      [
        'Arrow',
        {
          location: 1,
          id: 'arrow'
        }
      ]
    ],
    // round endpoints with a radius of 10
    endpoint: ['Dot', {radius: 10}],
    // gray endpoints
    endpointStyle: {fill: 'rgb(80, 81, 81)'},
    // our diagram will use the HTML Element with the ID 'editor' as its container
    container: 'editor'
  })

  //...
})
Adding and removing elements
So, we have a configured instance of jsPlumb. Now we need to add some nodes to the graph. There are quite a few different ways to do this, as any of the functions that interact with node elements will add them to the diagram. These functions are members of that instance created above.
addEndpoint()- add an endpoint to an element. The first argument is the ID or HTML Element of the node, and the second one is an endpoint options object.makeSource()- designate an element to be able to create connections by dragging from it. The options object has a useful property calledfilterwhich allows you to define an area from which the connections can be dragged. This is a query selector similar to the one you might use indocument.querySelector.makeTarget()- make an element able to receive connections dropped onto it.connect()- this takes an object withsourceandtargetproperties, as well as an optional options object. This is how you programmatically create a connection.manage()- if you don’t want to do any of the above, but still want an element to be recognized as a jsPlumb node use this.unmanage()- this is now the only supported way to remove a node from jsPlumb. You have to clean up the HTML Element yourself, unlike in previous versions that had aremove()function. It’s important to callunmanage()otherwise jsPlumb will still hold references to the removed element.
Here’s an example of how to create a new HTML Element and insert it into the graph:
const create = (x, y, name) => {
  const el = document.createElement('div')
  // jsPlumb comes with a handy ID generator
  el.id = instance.uuid()

  // this part is optional, it just creates a text label
  const labelEl = document.createElement('div')
  labelEl.innerText = name
  el.appendChild(labelEl)

  // it's useful to have a button to delete nodes
  const deleteEl = document.createElement('div')
  deleteEl.innerText = 'X'
  deleteEl.onclick = e => {
    // remove the element from jsPlumb and the DOM
    instance.unmanage(el)
    el.remove()
  }
  el.appendChild(deleteEl)

  // the "handle" element is where we will create connections
  const handleEl = document.createElement('div')
  handleEl.innerText = '➞'
  handleEl.className = 'handle'
  el.appendChild(handleEl)

  // jsPlumb uses absolute positioning
  el.style.position = 'absolute'
  el.style.left = `${x}px`
  el.style.top = `${y}px`

  // getContainer is a convenience method to get the container element
  instance.getContainer().appendChild(el)

  // the filter property means that only the handle element will act as a drag source
  instance.makeSource(el, { filter: '.handle' })
  // allowLoopback refers to connections with the same source and target
  instance.makeTarget(el, { allowLoopback: false })
}
Querying the diagram
I believe that the paid plan comes with more options for binding data to your diagram, however we can do a pretty decent job with the community version.
getManagedElements()returns an object mapping IDs to HTML Elements for all the Elements registered as nodes in the diagram.getConnections()andselect()can be used to query connections using a filter, generally the source and/or target IDs.select()has a lot of useful functions you can chain onto it to modify the connections returned by the query. See this documentation page for all the stuff you can do with it.
Remember that each managed HTML Element has an ID, so you can use this to map your data to the view. Here’s how you can save your diagram to JSON format.
// nodes object maps element IDs to the data being presented by the node
const nodes = {}

//...

const save = () => {
  // get all the node elements
  const elements = instance.getManagedElements()
  return Object.entries(elements).reduce((result, e) => ({
    // keep the existing entries
    ...result,
    // add a new entry for this ID
    [e[0]]: {
      data: nodes[e[0]],
      // jsPlumb positions objects using element styles,
      // so we can just grab that data like this
      position: {
        x: parseInt(e[1].el.style.left.replace('px', '')),
        y: parseInt(e[1].el.style.top.replace('px', ''))
      },
      // IDs of nodes connected to from this node
      targets: instance.getConnections({source: e[0]}).map(c => c.targetId)
    }
  }), {})
}
How to
Prevent duplicate connections
In a lot of cases it doesn’t really make sense to have more than one connection with the same source and target. The beforeDrop event allows you to return false to prevent a connection from being made.
instance.bind('beforeDrop', info => !instance.select({source: info.sourceId, target: info.targetId}).length)Constrain element dragging to the container
This is supposed to be supported in the drag options for the newInstance function, but at the time of writing it hasn’t been implemented, so I came up with this:
instance.bind('drag:move', info => {
  const parentRect = instance.getContainer().getBoundingClientRect()
  const childRect = info.el.getBoundingClientRect()
  if (childRect.right > parentRect.right) info.el.style.left = `${parentRect.width - childRect.width}px`
  if (childRect.left < parentRect.left) info.el.style.left = '0px'
  if (childRect.top < parentRect.top) info.el.style.top = '0px'
  if (childRect.bottom > parentRect.bottom) info.el.style.top = `${parentRect.height - childRect.height}px`
})
Prevent element dragging
const instance = jsPlumb.newInstance({
  //...
  elementsDraggable: false
})
I hope you enjoyed this blog post, from time to time I will be explaining some more of the technology behind Fantastic.